perrynzhou

专注于系统组件研发

0%

System IO

  • System IO指的是使用open/close/read/write/lseek系统调用使用io的方式,这样的方式是实打实的从user space->kernel space中函数调用,这样的方式是实时性高。

    Standard IO

  • Standard IO 是是指使用stdio中的FILE中的fopen/fclose/fread/fwrite/fseek等方式进行IO的操作.使用stdio中的函数实现是依赖底层system io的系统函数。stdio中的函数是带有cache的机制,说简单点就是merge system io函数的调用,已达到在kernel层面减少系统调用的,这样的IO方式可以提高吞吐量。

文件描述符本质

image.png

  • 每个文件open/fopen以后会产生一个inode-struct.一个inode-struct包含了文件操作的基本属性以及position,position是这个文件读写的位置。每个inode-struct会保存在每个进程中的文件描述符的数组中,open返回的fd就是这个数组的下边。

  • 每个进程在默认情况下最多打开1024个文件描述符,0/1/2默认是是输入、输出、错误输出。

  • 进程中文件描述符数组使用方式按照最小下标方式。

  • FILE 结构中的position和inode-struct中的postition基本不是一样的,这个为什么?比如执行三次fput(FILE,’a’),这样的操作在FILE结构中postion会++3次。这个position中是揍batch然后在kernel层面统一执行一次系统调用。

  • System IO 和 Standard IO 不能混用。

    验证推断

  • 实例代码验证standard io缓冲以及system io 实打实的调用

    1
    2
    3
    4
    5
    6
    7
    8
    9
    10
    11
    12
    13
    14
    15
    16
    17
    18
    19
    20
    21
    22
    /*************************************************************************
    > File Name: test.c
    > Author:perrynzhou
    > Mail:perrynzhou@gmail.com
    > Created Time: Sat May 4 21:58:45 2019
    ************************************************************************/

    #include <stdio.h>
    #include <unistd.h>
    #include <stdlib.h>
    int main()
    {
    putchar('a');
    write(1, "b", 1);

    putchar('a');
    write(1, "b", 1);

    putchar('a');
    write(1, "b", 1);
    exit(0);
    }
  • 执行结果如下

Snipaste_2019-05-04_22-11-44.png

  • trace下test执行路径
    Snipaste_2019-05-04_22-16-58.png

  • 分析
    strace后的执行路径,可以看出,putchar执行三次最后是一次write(1,”aaa”,3)写入。其他的关于b的写入,每一次write都会写一次。

进程关系

zombies进程

  • linux中的pid号和file的fd号的规则不同,pid的增长是逐次递增使用,如果达到上限再来一次从小到大的周期,寻找可用的pid号。如果没有就会出现系统错误。
    • linux fork后子进程先于父进程退出,这个进程子进程就是zombies的进程,zombies的进程占用的是pcb块资源以及pid资源,zombies的进程最终由1号(init process接管),统一由init process回收这些zombies进程,但是这个回收zombies的进程是异步的

      孤儿进程

    • linux fork之后父进程退出,子进程存活,这些子进程是孤儿进程,孤儿进程是由init process接管。这些孤儿进程最开始得父进程是fork出来这些子进程的父进程,之后父进程退出后,孤儿进程的父进程就是1号进程(init process)

      zombies 代码例子

      image.png
1
2
3
4
5
6
7
8
9
10
11
12
13
14
15
16
17
18
19
20
21
22
23
24
25
26
27
28
29
30
31
32
33
34
35
36
37
38
39
40
41
42
43
44
45
46
47
48
49
50
51
52
53
54
55
56
57
58
59
60
61
62
63
64
65
66
67
68
69
/*************************************************************************
> File Name: fork0.c
> Author:perrynzhou
> Mail:perrynzhou@gmail.com
> Created Time: Sun 16 Jun 2019 01:55:54 PM CST
************************************************************************/

#include <stdio.h>
#include <getopt.h>
#include <ctype.h>
#include <stdlib.h>
#include <unistd.h>
#include <string.h>
int is_num(const char *s)
{
if (NULL == s)
{
return -1;
}
size_t len = strlen(s);
for (int i = 0; i < len; i++)
{
if (isdigit(s[i]) == 0)
{
return -1;
}
}
return 0;
}
int main(int argc,char *argv[])
{
int pn, fn;
int default_pn = 2;
const char *cmd_line = "p:";
char ch;
while ((ch = getopt(argc, argv, cmd_line)) != -1)
{
int flag = is_num(optarg);
switch(ch)
{
case 'p':
pn = (flag == 0) ? atoi(optarg) : default_pn;
break;
default:
break;
}
}
fprintf(stdout,"process number:%d\n",pn);
fflush(NULL);
for (int i = 0; i < pn; i++)
{
fflush(NULL);
pid_t pid = fork();
if (pid == -1)
{
perror("fork()");
exit(1);
}
if (pid == 0)
{
fprintf(stdout, "child process %ld,parent process %ld\n", getpid(), getppid());
//sleep(100000);
exit(0);
}
}
sleep(10000);
exit(0);
return 0;
}
孤儿进程

image.png

1
2
3
4
5
6
7
8
9
10
11
12
13
14
15
16
17
18
19
20
21
22
23
24
25
26
27
28
29
30
31
32
33
34
35
36
37
38
39
40
41
42
43
44
45
46
47
48
49
50
51
52
53
54
55
56
57
58
59
60
61
62
63
64
65
66
67
68
69
/*************************************************************************
> File Name: fork0.c
> Author:perrynzhou
> Mail:perrynzhou@gmail.com
> Created Time: Sun 16 Jun 2019 01:55:54 PM CST
************************************************************************/

#include <stdio.h>
#include <getopt.h>
#include <ctype.h>
#include <stdlib.h>
#include <unistd.h>
#include <string.h>
int is_num(const char *s)
{
if (NULL == s)
{
return -1;
}
size_t len = strlen(s);
for (int i = 0; i < len; i++)
{
if (isdigit(s[i]) == 0)
{
return -1;
}
}
return 0;
}
int main(int argc,char *argv[])
{
int pn, fn;
int default_pn = 2;
const char *cmd_line = "p:";
char ch;
while ((ch = getopt(argc, argv, cmd_line)) != -1)
{
int flag = is_num(optarg);
switch(ch)
{
case 'p':
pn = (flag == 0) ? atoi(optarg) : default_pn;
break;
default:
break;
}
}
fprintf(stdout,"process number:%d\n",pn);
fflush(NULL);
for (int i = 0; i < pn; i++)
{
fflush(NULL);
pid_t pid = fork();
if (pid == -1)
{
perror("fork()");
exit(1);
}
if (pid == 0)
{
fprintf(stdout, "child process %ld,parent process %ld\n", getpid(), getppid());
sleep(100000);
exit(0);
}
}
// sleep(10000);
exit(0);
return 0;
}

  • 寄存器以及中断号对应表
eax(系统调用号) 系统调用 ebx(系统调用参数1) ecx(系统调用参数2) ecx(系统调用参数3) edx(系统调用参数4 ) esx(系统调用参数5) edi(系统调用参数6)
1 sys_exit int
4 sys_write unsigned int const char * size_t
  • hello.asm汇编代码解释
    //定义数据段
    SECTION .data;
    

//db 代表一个字节占8个字节,读完一个偏移量加1字节
//dw 是汇编中的一个字,就是占用2个字节,读完一个偏移量加2
//dd 是汇编中的一个双字节,占用4个字节,读完一个偏移量加4
MyMsg: db “hello,word”;
MyMsgLen: equ $-MyMsg;

//定义bbs段
SECTION .bbs;
//定义代码段
SECTION .text;

global _start;

_start:
nop;
mov eax,4; //把4号系统调用写入到eax,sys_write写入到eax寄存器
mov ebx,1; //把1号文件描述符写入到ebx
mov ecx,MyMsg; //把MyMsg的地址写入到ecx
mov edx,MyMsgLen; //把MyMsgLen写入到edx
int 80H; //调用系统sys_write,回去eax取出对应的中断号,同时从ebx,ecx,edx出去系统调用参数进行调用
mov eax,1; //把1号系统调用写入到eax
mov ebx ,0; //把0写入到ebx中
int 80H; //调用系统exit


- linux系统中断对应表


![image.png](https://upload-images.jianshu.io/upload_images/2582954-c5536607f4a7b75d.png?imageMogr2/auto-orient/strip%7CimageView2/2/w/1240)

1.go mod 替代原来gopath的功能,依赖包下载依赖Go环境变量

1
2
export GO111MODULE=on
export GOPROXY=https://mirrors.aliyun.com/goproxy/

2.go mod init 一个golang 项目

  • go mod 的命令使用
    1
    2
    3
    4
    5
    6
    7
    8
    9
    10
    11
    12
    13
    14
    15
    $ go help mod
    Usage:

    go mod <command> [arguments]

    The commands are:

    download download modules to local cache
    edit edit go.mod from tools or scripts
    graph print module requirement graph
    init initialize new module in current directory
    tidy add missing and remove unused modules
    vendor make vendored copy of dependencies
    verify verify dependencies have expected content
    why explain why packages or modules are needed
  • 用go mod 初始化glusterfs-benchmark依赖包管理
1
2
3
4
//进入glusterfs-benchmark目录
cd glusterfs-benchmark
go mod init glusterfs-benchmark
//会在 lusterfs-benchmark目录中 生成go.mod的文件
  • 项目目录架构
    1
    2
    3
    4
    5
    6
    7
    8
    9
    10
    11
    12
    13
    14
    15
    16
    17
    18
    [perrynzhou@Debian ~/Source/perryn/glusterfs-benchmark]$ tree ../glusterfs-benchmark/
    ../glusterfs-benchmark/
    ├── api
    │   ├── fuse_fetch.go
    │   └── glfs_fetch.go
    ├── conf
    │   └── conf.go
    ├── go.mod
    ├── metric
    │   └── metric.go
    ├── pkg
    │   └── mod
    │   └── cache
    │   └── lock
    └── utils
    └── utils.go

    14 directories, 114 files
  • 引入glusterfs-benchmark/api/fuse_fetch.go中引入utils库本地库
1
2
3
4
5
6
7
8
9
10
11
12
13
14
15
// fuse_fetch.go的包信息
package api

import (
"bufio"
"fmt"
log "github.com/sirupsen/logrus"
"glusterfs-benchmark/conf"
"glusterfs-benchmark/metric"
"glusterfs-benchmark/utils"
"os"
"path/filepath"
"sync"
"sync/atomic"
)
1
2
3
4
5
6
//修改go.mod文件
module glusterfs-benchmark

go 1.14

require github.com/sirupsen/logrus v1.4.2
  • 项目构建
    1
    2
    3
    4
    5
    6
    //进入包含main.go的目录下执行go mod vendor,保存依赖包
    go mod vendor
    //下载第三方依赖库
    go mod tidy -v
    //编译项目
    go build -mod=vendor

文件系统(note by perrynzhou).png

1.文件系统的系统调用
  • 例如:read、write
2.虚拟文件系统(vfs virtual filesystem switch)
  • 超级块对象

    • 简介

      • 1.代表已安装文件系统
      • 2.每个文件系统都会对应一个超级块对象
      • 3.描述整个文件系统信息(组织结构和管理信息),不涉及文件系统的内容
      • 4.具体文件系统在安装时候建立,并在这些文件系统卸载时自动删除
      • 5.vfs的超级超级块存在于内存,每个分区所挂在的文件系统都有一个属于该文件系统和分区的超级块存在于磁盘
    • 操作对象

      • super_operations

        • 包括内核对特定文件系统所能调用的方法,比如read_inide/sync_fs等
  • 索引节点对象

    • 简介

      • 1.代表一个文件,包括访问权限、属主、组、大小、生成时间和访问时间
      • 2.内核操作文件或者目录时需要的全部信息,一个文件对应一个inode(唯一)
      • 3.具体文件系统的inode持久化在磁盘,访问时调入内存,vfs的inode存在于内存
      • 4.vfs的inode是xfs inode的抽象,映射与扩充,而后者是前者的静态信息部分,也是对前者(vfs inode)的具体化、实例化和持久化
    • 操作对象

      • inode_operations

        • 包括内核针对文件所能调用的方法,比如create/link等
  • 目录项对象(动态创建)

    • 简介

      • 1.代表一个目录项,是路径组成的一部分

      • 2.用于方便查找目录,找到后缓存目录到dcache中

        • 例如/bin/vi,这个目录bin是目录文件,vi是普通文件
      • 3.该目录对象存在于内存,磁盘并没有任何的持久化

    • 操作对象

      • dentry_operations

        • 内核针对目录所能调用方法,比如d_cpmpare/d_delete等
  • 文件对象

    • 简介

      • 1.代表进程打开的文件的内存表现形式

        • 调用open/close来创建和销毁文件对象
      • 2.文件对象存在于内存,在磁盘并没有具体的存储

    • 操作对象

      • file_operations

        • 内核针对进程已打开的文件所能调用方法比如read/write等
挂在到VFS的实际文件系统
  • 例如:ext3、ext4、xfs

虚拟文件系统.png

Welcome to Hexo! This is your very first post. Check documentation for more info. If you get any problems when using Hexo, you can find the answer in troubleshooting or you can ask me on GitHub.

Quick Start

Create a new post

1
$ hexo new "My New Post"

More info: Writing

Run server

1
$ hexo server 或者 hexo s

More info: Server

Generate static files

1
$ hexo generate 或者 hexo g

More info: Generating

Deploy to remote sites

1
$ hexo deploy 或者hexo d

More info: Deployment

glusterfs 小文件调优指南

获取glusterfs参数说明和默认值
  • glusterfs获取所有可用参数

    1
    # gluster volume set help
  • 获取指定参数

    1
    # gluster volume set help|grep "cache-min-file-size" -A7
    glusterfs volume调优参数
  • 1.目录操作性能

    1
    2
    3
    4
    5
    6
    7
    8
    9
    10
    11
    12
    13
    14
    15
    16
    17
    18
    19
    20
    21
    22
    23
    24
    25
    26
    Option: performance.readdir-ahead
    Default Value: on
    Description: enable/disable readdir-ahead translator in the volume.

    Option: performance.rda-cache-limit
    Default Value: 10MB
    Description: maximum size of cache consumed by readdir-ahead xlator. This value is global and total memory consumption by readdir-ahead is capped by this value, irrespective of the number/size of directories cached

    Option: cluster.readdir-optimize
    Default Value: off
    Description: This option if set to ON enables the optimization that allows DHT to requests non-first subvolumes to filter out directory entries.

    Option: cluster.lookup-unhashed
    Default Value: on
    Description: This option if set to ON, does a lookup through all the sub-volumes, in case a lookup didn't return any result from the hash subvolume. If set to OFF, it does not do a lookup on the remaining subvolumes.

    Option: performance.parallel-readdir
    Default Value: off
    Description: If this option is enabled, the readdir operation is performed in parallel on all the bricks, thus improving the performance of readdir. Note that the performance improvement is higher in large clusters

    gluster volume set dht_vol performance.readdir-ahead on
    gluster volume set dht_vol cluster.readdir-optimize on
    gluster volume set dht_vol cluster.lookup-unhashed off
    gluster volume set dht_vol performance.parallel-readdir on
    //默认是关闭
    gluster volume set dht_vol group metadata-cache
  • 2.inode缓存大小

    1
    2
    3
    4
    5
    6
    7
    //官方解释
    Option: network.inode-lru-limit
    Default Value: 16384
    Description: Specifies the limit on the number of inodes in the lru list of the inode cache.

    //设置
    gluster volume set dht_vol network.inode-lru-limit 100000
  • 3.实际IO操作线程调整

    1
    2
    3
    4
    5
    6
    7
    //官方解释
    Option: performance.io-thread-count
    Default Value: 16
    Description: Number of threads in IO threads translator which perform concurrent IO operations

    // 设置值小于等于可用CPU的合数
    gluster volume set dht_vol performance.io-thread-count 32
  • 4.客户端rpc请求吞吐量设置

    1
    2
    3
    4
    5
    Option: server.outstanding-rpc-limit
    Default Value: 64
    Description: Parameter to throttle the number of incoming RPC requests from a client. 0 means no limit (can potentially run out of memory)

    gluster volume set dht_vol server.outstanding-rpc-limit 512
  • 5.event线程数设置(提高性能,降低响应时间)

    1
    2
    3
    4
    5
    6
    7
    8
    9
    10
    11
    12
    //官方解释
    Option: client.event-threads
    Default Value: 2
    Description: Specifies the number of event threads to execute in parallel. Larger values would help process responses faster, depending on available processing power. Range 1-32 threads.

    Option: server.event-threads
    Default Value: 2
    Description: Specifies the number of event threads to execute in parallel. Larger values would help process responses faster, depending on available processing power.

    //设置超过可用CPU核数会导致context切换严重
    gluster volume set dht_vol client.event-threads 8
    gluster volume set dht_vol server.event-threads 8
  • 6.io-cache调整

    1
    2
    3
    4
    5
    6
    7
    8
    9
    10
    11
    12
    13
    14
    15
    16
    17
    18
    19
    20
    21
    22
    23
    24
    25
    26
    27
    28
    29
    //官方解释
    # gluster volume set help|grep "io-cache" -A7
    Option: performance.cache-min-file-size
    Default Value: 0
    Description: Minimum file size which would be cached by the io-cache translator.

    Option: performance.cache-min-file-size
    Default Value: 0
    Description: Minimum file size which would be cached by the io-cache translator.

    Option: performance.cache-refresh-timeout
    Default Value: 1
    Description: The cached data for a file will be retained for 'cache-refresh-timeout' seconds, after which data re-validation is performed.

    Option: performance.io-cache-pass-through
    Default Value: false
    Description: Enable/Disable io cache translator

    Option: performance.io-cache
    Default Value: on
    Description: enable/disable io-cache translator in the volume.

    Option: performance.open-behind
    Default Value: on
    Description: enable/disable open-behind translator in the volume.


    //当前我们采用opencas作为glusterfsd的后端存储,同时我们业务场景又是存储10亿+的小文件,因此IO-cache开启的意义不大,默认是开启(针对大文件效果好),需要关闭才可以
    gluster volume set dht_vol performance.io-cache off
gluster volume调优样例
1
2
3
4
5
6
7
8
9
10
11
12
13
14
15
16
17
18
19
20
21
22
23
24
25
26
27
28
# gluster volume info warm_vol1 

Volume Name: warm_vol1
Type: Distribute
Volume ID: d36874f3-60a0-458a-88b3-7f5ed18c645e
Status: Started
Snapshot Count: 0
Number of Bricks: 2
Transport-type: tcp
Bricks:
Brick1: 172.21.73.96:/glusterfs/warmvol1/data1/brick1
Brick2: 172.21.73.96:/glusterfs/warmvol1/data2/brick1
Options Reconfigured:
performance.rda-cache-limit: 1024MB
client.event-threads: 8
server.outstanding-rpc-limit: 512
performance.io-thread-count: 32
server.event-threads: 8
network.inode-lru-limit: 500000
performance.read-ahead-page-count: 16
cluster.min-free-inodes: 25%
performance.readdir-ahead: on
cluster.readdir-optimize: on
cluster.lookup-optimize: on
performance.io-cache: off
cluster.lookup-unhashed: off
performance.parallel-readdir: on
storage.fips-mode-rchecksum: on
linux 网络参数调优
1
2
3
4
5
6
7
8
9
//vi /etc/sysctl.conf 添加如下内容
net.core.rmem_max=67108864
net.core.wmem_max=67108864
net.ipv4.tcp_wmem=33554432
net.ipv4.tcp_rmem=33554432
net.core.netdev_max_backlog=30000
net.ipv4.tcp_congestion_control=htcp

// sysctl -p 生效

Open Cas 架构概览

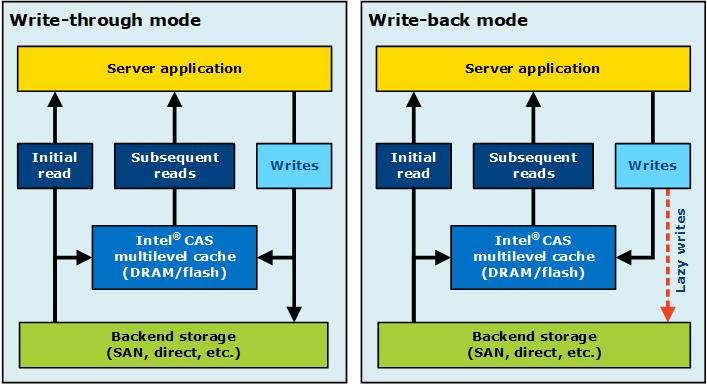
  • 数据从HDD盘读取然后拷贝到open cas 的cache中,后续数据读取都是从内存读取,提高读写效率。

  • 在write-through模式,所有的数据都是同步刷新到open cas的ssd和后端hdd硬盘中。

  • 在write-back模式中,所有数据同步写入open cas的ssd中,然后异步刷新到HDD中。

  • open cas 缓存满后,采用open cas的淘汰算法,用最新写入的数据淘汰以前旧数据,已达到oepn cas始终可以缓存数据。

    alt text

系统组件以来

  • sed
  • make
  • gcc
  • kernel-devel
  • kernel-headers
  • python3
  • lsblk
  • argparse (python module)

安装linux open cas

1.open cas 由kernel modules和cli工具组成
2.为了获取最佳性能,强烈推荐在SSD device采用noop的IO调度策略
3.具体安装步骤:
  • 下载open cas linux source

    1
    git clone https://github.com/Open-CAS/open-cas-linux
  • 获取子模块

    1
    2
    cd open-cas-linux 
    git submodule update –init
  • 配置和安装

    1
    2
    3
    ./configure
    make
    make install
  • 检查和验证

    1
    2
    3
    4
    cas_disk.ko  //open cas 磁盘内核模块
    cas_cache.ko //open cas 缓存内核模块
    casadm //open cas 管理员工具
    casadm -V //install 检验

open cas配置

  • 配置文件在utils/opencas.conf中,包括cache的配置和core devices的配置

    • caches配置说明

      1
      2
      3
      4
      5
      6
      7
      1.cache id:执行设备的启动实例ID,整形取值范围在1~16384
      2.path:指向ssd的磁盘路径
      3.desired mode:预期模式,一共有5中模式,分别是write-through/write-back/write-only/pass-through
      4.extra fields:用户自定义IO配置
      4.1 ioclass_file:允许用户加载自定义IO策略
      4.2 cleaning_policy :允许用户缓存清理的策略,包括了acp/alru/nop
      4.3 promotion_policy :允许用户使用缓存的推进策略,包括了always/nhit
    • core devices配置说明

1.cache id:每个core device对应的Cache id,整形,取值范围0~4095
2.core id:每个core device的id
3.path:core device的路径
    //每个cache和core devices必须执行已经存储在hdd和ssd,core device应该引用wwn的标识,cache device必须顺序数据。
  • 配置样例

    1
    2
    3
    4
    5
    6
    7
    8
    9
    10
    11
    12
    13
    14
    15
    16
    17
    18
    19
    20
    21
    22
    23
    24
    25
    26
    27
    ## Caches configuration section

    [caches]

    ## Cache ID Cache device Cache mode Extra fields (optional)

    1 /dev/disk/by-id/nvme-INTEL_SSD WT ioclass_file=/etc/opencas/ioclass-config.csv

    ## Core devices configuration

    [cores]

    ## Cache ID Core ID Core device

    1 1 /dev/disk/by-id/wwn-0x50014ee0aed22393

    1 2 /dev/disk/by-id/wwn-0x50014ee0042769ef

    1 3 /dev/disk/by-id/wwn-0x50014ee00429bf94

    1 4 /dev/disk/by-id/wwn-0x50014ee0aed45a6d

    1 5 /dev/disk/by-id/wwn-0x50014ee6b11be556

    1 6 /dev/disk/by-id/wwn-0x50014ee0aed229a4

    1 7 /dev/disk/by-id/wwn-0x50014ee004276c68
  • cas管理工具

    • 手动配置 write-through 模式

      • 在该模式下, caching software 写入数据到flash device,然后顺序的写到到core device中,这种模式100%保证core device中数据和cache中数据一致,同时可以共享给其他的服务读取,这种类型可以加速读操作
      1
      2
      casadm -S -i 1 -d /dev/sdc  //创建id=1的cache
      casadm -A -i 1 -d /dev/sdb //匹配/dev/sdb到cache
    • 手动配置write-back模式

      • 在该模式下, caching software首先把数据先写入到cache中,然后通知用户写完毕了,最后周期性的把数据写入到core device中,write-back模式提高了读写性能,但是会有数据丢失的风险
        1
        2
        casadm -S -i 1 -d /dev/sdc -c wb
        casadm -A -i 1 -d /dev/sdb //匹配/dev/sdb到cache
    • 手动配置Write-around模式

      • 在write-around模式下, 只有block数据已经存在于cache中,caching software把数据才会写入到flash device中,然后顺序写数据到core device.这种模式100%保证core device和cache一致, 写回操作进一步优化了缓存,以避免在写入数据且随后不经常重新读取数据的情况下对缓存的污染 。

        1
        casadm -S -i 1 -d /dev/sdc -c wa
      • 手动配置pass-through模式

      • 在该模式下,caching software所有操作都绕开cache.

        1
        casadm -S -i 1 -d /dev/sdc -c pt
    • 手动配置write-only模式

      • 在write-only模式下,缓存系统先把数据写入到cache中,然后通知应用端写完成。后续周期性的同步写到core device中,当有新的读请求。只有当之前写入数据在cache device中,读请求会绕开cache software,直接读取caching device的数据。该模式仅仅提高写性能,但是会有数据丢失风险。
      1
      casadm -S -i 1 -d /dev/sdc -c wo

issue 列表

  • 1.glusterfsd crash due to health-check failed, going down ,system call errorno not return
    1
    https://github.com/gluster/glusterfs/issues/1168
  • 2.glusterfsd memory leak killed by os #1166
    1
    https://github.com/gluster/glusterfs/issues/1166
  • 3.Major bug,glusterfsd consume to much cpu resource #1133
    1
    https://github.com/gluster/glusterfs/issues/1133
    1. opencase case write page lost
1
https://github.com/Open-CAS/open-cas-linux/issues/396
  • 5.Fatal Bug:distribute replica 3,one brick of data is different from another replicate one brick #1184
1
https://github.com/gluster/glusterfs/issues/1184

1.官方解释

1
2
3
4
5
6
7
8
[root@centos-linux ~]$ gluster volume set help|grep read-hash-mode -A7
Option: cluster.read-hash-mode
Default Value: 1
Description: inode-read fops happen only on one of the bricks in replicate. AFR will prefer the one computed using the method specified using this option.
0 = first readable child of AFR, starting from 1st child.
1 = hash by GFID of file (all clients use same subvolume).
2 = hash by GFID of file and client PID.
3 = brick having the least outstanding read requests.